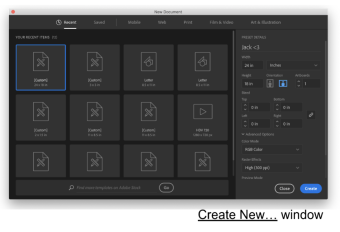
Document Setup
- Open Adobe Illustrator (Ai) and click on Create New…
- Set the document's size to 24 x 18 inches (this is the capacity of the laser cutter)
- Set the color mode to "RGB" (you will have to toggle the Advanced Options dropdown)
- Click Create. The white space you see is called your “artboard”.
Understanding the Types of Cuts
There are three different styles of cuts that the laser cutter can perform:
- Vector cut - the laser will follow a path and cut all the way through your material
- To create a vector cut, the line must be "pure red". In "RGB" language this means R=255, G=0, B=0. The other parameter to change is the line Stroke, meaning its thickness. Set the stroke to 0.01 pts.
- Vector engrave - the laser will follow a path and cut partially through your material
- To create a vector engrave, the line must be "pure blue", aka R=0, G=0, B=255. Again, set the stroke to 0.01 pts.
- Raster engrave - the laser will create your image by engraving "pixels", and cut partially through your material
- To create a raster engrave, the shape must be in greyscale. The blacker the color, the deeper the laser will engrave. To do a maximum depth raster engrave, set the Fill color to pure black(R=0, G=0, B=0).
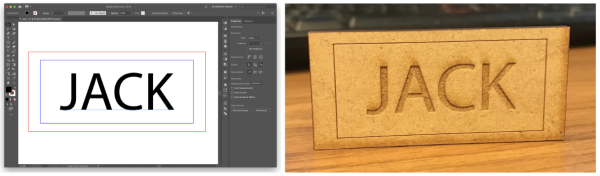
Draw your Design
Check out this name tag to highlight the different types of cuts:
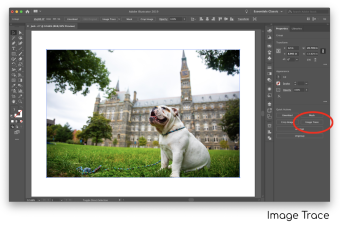
Using Image Trace:
The Image Trace tool is one of the most powerful tools in Adobe Illustrator (Ai) for converting images to laser cut files. Here’s how you can use it:
-
Insert your image into Ai. Here are the methods for doing that:
-
Copy and paste
-
File > Open (will open your image into a new Ai file)
-
File > Place, then click on your artboard to place
-
-
With the Selection Tool, click once on the image. You should see a blue line around the image with small transformation boxes on the corners and sides.
-
Click on Image Trace, then choose which option you want. The two commonly used for the laser cutter are:
-
Shades of Gray - will convert your image to grayscale. The laser cutter will modulate the intensity of engraving, with black color causing the deepest engraving and white color resulting in no engraving. This can produce a very interesting gradient effect, but may take some trial and error to get right.
Image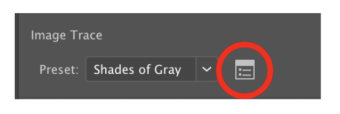
-
Black and White Logo - will convert your image to black and white
-
-
To change the parameters of the Image Trace, click on the settings window of the Image Trace panel. Toggle the Advanced dropdown to see all of the controls. The main controls to play around with are:
-
Image

Grays/Threshold - affects the number of shades of gray used / changes the balance between
black and white
-
Paths - how many small line segments to use to represent a shape. High paths is good for complicated geometries, low paths is better for smooth curves
-
Corners - how sharp the corners are. A high corner value will provide sharp corners, a low corner value will provide rounded corners
-
Noise - ignores areas of your image smaller than a certain pixel size.
-
-
Expand the Image Trace. This converts the image into vector shapes which the laser cutter can read.
-
Note: all of the shapes are automatically grouped together. To modify individual shapes, click the Ungroup button
-
-
You’re done Image Tracing!